Check out my custom vibration dampener


How to Wear a Tennis Elbow Brace
Step-by-Step Placement
We hope you love this article. Just so you know, TennisCompanion may collect a small share of sales from the links on this page to help keep this site running. Learn more.

For many, a tennis elbow brace or strap may offer an effective means of relieving discomfort when playing the sport you love.
However, wearing a brace with proper placement is essential to achieve optimal results and avoid aggravating symptoms.
In this guide, we’ll provide detailed step-by-step guidance for wearing your brace, which we hope you’ll find helpful as a purely informational supplement to the instructions that came with your brace.
Disclaimer: This guide is for information purposes only and is not intended as a substitute for professional medical advice, diagnosis, or treatment. Always seek the guidance of your doctor or other qualified health professional with any questions you may have regarding your health or a medical condition.
Article Contents
Click below to jump to a section
Tap below to jump to a section
Measure Your Arm
Select a Brace
Unbox Brace & Prep Arm
Place Hand Through Brace
Slide the Brace Up Your Arm
Position the Brace
Gently Tighten the Brace
Adjust the Brace if Needed
Tips for Wearing Your Brace
New to TennisCompanion?
Create a free account and explore my latest videos below
Before Starting

Although tennis elbow braces may offer players an effective means for treating their symptoms, there’s no substitute for a proper diagnosis.
With that in mind, before you begin using a tennis elbow brace or strap, we’d strongly encourage you to seek the advice of your physician or qualified healthcare professional.
Doing so can help you confirm the discomfort you’re experiencing is indeed tennis elbow, rule out other causes, and ensure you have a robust support system for treatment.
Depending on your preference, you might consider reaching out to your primary care physician, a nurse practitioner, physician’s assistant, physical therapist, chiropractor, or acupuncturist.
At the very least, a brief conversation will help ensure you’re on the right track and taking appropriate steps for care.
Step 1: Measure Your Arm
If you’ve already purchased a brace and you’re confident in your selection of the correct size, feel free to skip to Step 3.
For the best results, it’s crucial to wear a tennis elbow brace that fits properly. Depending on the manufacturer or brand, a product may come in a one-size-fits-all design or various individual sizes.
Regardless, it’s practical to measure your arm to ensure the brace you purchase fits appropriately because all straps have their minimum and maximum ranges for effective use.
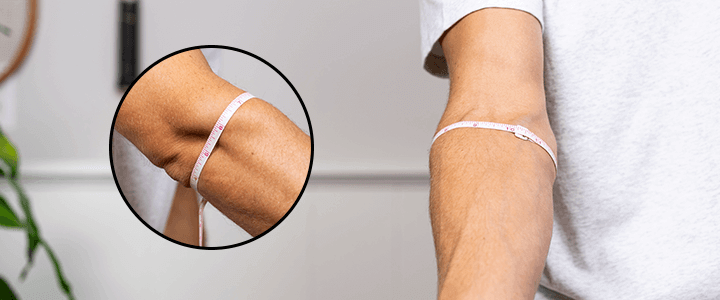
If you have one on hand, you can use a flexible measuring tape that wraps your arm to provide an accurate measurement.
To measure, stick your arm straight out and measure around your forearm just below your elbow. You can check the visual above for accurate placement of the measuring tape.
Alternatively, if you only have a standard measuring tape, you can use a shoelace, string, piece of cloth, or even an overgrip.
For example, if using a shoelace, start by wrapping it around your forearm right below your elbow, and then hold the shoelace where it overlaps.
Next, use your measuring tape to measure from the tip of the shoelace to the portion you’re holding.
Be sure to note your measurement, which you’ll need for the next step when selecting a brace.
Step 2: Select a Brace

There is a wide range of tennis elbow braces available that function similarly and offer the same benefits, so the one you end up selecting boils down to personal preference.
With that said, there are two key features to consider for best results. First, you want to make sure the strap is comfortable to wear as you’ll fit it snug to your skin for extended periods.
Second, you want to make sure you select a durable option that will stand up to repetitive use and not fall apart. A quick look at previous customer reviews should help you avoid inferior quality products.
To help, here are three of the best tennis elbow braces, which we have direct experience with and are well-reviewed.
Once you find one you like, don’t forget to check the sizing against your measurement from the previous step. Also, keep in mind that many of the braces you’ll find are adjustable to help you find the perfect fit.
Step 3: Unbox the Brace & Prep Your Arm

Once you’ve purchased your tennis elbow brace, you can go ahead and unbox it and take note of the contents.
For example, if you’ve purchased from Sleeve Stars, you’ll have three different band lengths, so you’ll need to select the correct size. We’d also encourage you to review any included instructions as a point of reference.
Before you begin to wear your tennis elbow brace, make sure to thread the strap through the rings, which will make it easier to place on your arm.
Next, we’d encourage you to wear a short-sleeve shirt or tank and remove any watches or jewelry to make it easier to achieve the ideal placement.
Step 4: Place Your Hand Through the Brace

For easy placement of the brace, make sure the strap is loose. Depending on the product, you may need to undo the velcro to do so.
Carefully place the hand of your affected arm through the brace to avoid the strap coming loose from the rings and ensure the pad, if included, is facing inward so it can provide the necessary support.
Step 5: Slide the Brace Up Your Arm

Once over your hand, slide the brace up your arm. It should fall roughly 1-3 inches (3-8 cm) down from the tip of your elbow.
To avoid unnecessary irritation and ensure proper range of motion, you want to position the brace away from your elbow’s crease.
Step 6: Position the Brace

For tennis elbow, you’ll want to position the brace between your forearm’s top and outside edge, as highlighted in the above diagram.
Furthermore, it’s best to slide the brace roughly one inch below (toward your wrist) from where you’re feeling the pain, not directly on it. If your brace has a pad, you’ll want it near the area of discomfort.
To help identify the correct area of your arm for placement, you can wiggle your fingers and watch the muscles on the outside of your arm just below the elbow wiggle.
Step 7: Gently Tighten the Brace

After you find the correct positioning for the brace, you’ll need to gently tighten the velcro strap so that it’s snug and secure.
You should feel slight pressure, but it shouldn’t be overly tight. If you have any tingling, numbness, or discoloration in your hand or arm, then loosen the strap and retighten with less force.
Step 8: Adjust the Brace if Needed

Once you tighten the brace against your arm, you may find it requires a slight repositioning for the ideal placement.
If so, loosen the strap slightly and rotate it or position it higher or lower on your arm as necessary, then retighten.
Depending on the brace, you may need to make additional adjustments. For example, the Futuro Custom Pressure Elbow Strap has a small dial that allows you to adjust the pressure without loosening the velcro.
Tips for Wearing Your Brace

The right tennis elbow brace worn properly may help reduce discomfort. Here are a few tips for getting the best results.
Check Your Fit
As we’ve covered, if you don’t wear a brace properly, it may not provide the relief you’re hoping to achieve.
With that in mind, if you’re not getting results or your tennis elbow gets worse, we’d strongly encourage you to check in with a physician or qualified healthcare provider.
Not only can they help ensure a proper diagnosis of your discomfort, but they can also help confirm you’re wearing your brace correctly.
Try Different Style Braces
Although most tennis elbow braces function similarly, there are a variety of designs and materials out there.
If you’re not getting relief, you might consider another type of brace with a slightly different design to see if you end up with better results.
Test In Practice
Once you’ve found a brace you think will work well, we’d encourage you to test wearing it on the court while practicing before using it in a match so you can confirm it works as expected.
The last thing you need is to find out whether the brace you selected is uncomfortable or doesn’t stay put while trying to win a match.
Bring an Extra
Regardless of the quality, tennis elbow straps or the rings that hold them together may break or fail, rendering them useless.
Generally, they’re inexpensive, so it pays to have an extra in your bag, so you have a replacement on hand. It’s a small price to pay to make sure you can keep playing rather than having to call it a day.
Add a Compression Sleeve
Although similar, tennis elbow braces and compression sleeves offer different yet potentially complimentary benefits.
Despite the evidence, many players use compression sleeves for tennis elbow and report improvements, and in some cases, players combine the two devices for enhancing comfort and support.
If you haven’t tried the two together or alternating them, then it might be worth a shot to see if it helps.
Wrapping Up
For some, tennis elbow braces may offer welcome relief from discomfort, but only if players wear them correctly.
To that end, we hope this guide has helped fill in any gaps in your understanding of how to ensure the proper placement.
If you have a moment, we’d love to hear your experience with wearing tennis elbow braces and what kind you’re using for the best results.
Home > Gear > Braces & Sleeves > How to Wear
Play Better Tennis
Improve your game alongside our community of tennis players
Why join?
Discussion Boards
Join the conversation with other members of the community.
5 Point Friday
Read our weekly recap of the 5 most interesting things we dig up in tennis.
Leave a Reply
Want to join the discussion?Feel free to contribute!