Check out my custom vibration dampener
Perfecting Your Tennis Serve Grip Technique
A Guide to the Continental Grip
Today we’re going to talk about the tennis serve grip. It’s one of the very first things you’ll need to learn if you want to hit a proper tennis serve, and it’s something you can practice before you even step onto a court.
Once you feel comfortable with your grip, you should check out our article on forming the correct serve stance.
Article Contents
Click below to jump to a section
Tap below to jump to a section
The Best Serve Grip
Serve Grip Technique
Tips for the Serve Grip
Top Player Serve Grips
Wrapping Up
New to TennisCompanion?
Create a free account and explore my latest videos below
The Best Grip for Your Tennis Serve
If you’re new to tennis, you might be surprised to learn that there is a specialized grip for the tennis serve. It’s called the continental grip, but before we get into the details, let’s start by talking about why this is the best grip for your serve and the benefits of learning to use it.
There are four main benefits for learning the continental grip:
- Variety: One of the main reasons you’ll want to use the continental grip for your serve is that it allows you to hit various types of serves with ease. With the continental grip, you can hit a big flat serve, slice serve, topspin or kick serve. Learning to hit each of these serves will allow you to be more aggressive and keep your opponent guessing while also enabling you to hit a consistent and reliable second serve.
- Power: If you’re serious about your serve, then you’re going to want to learn the trophy pose, which will set you up for achieving maximum power and the fastest serve. However, to get the most out of the trophy pose, you need a grip that complements your service motion, and the continental grip is precisely the grip for the job.
- Control: One of the keys to the continental grip is that it allows you to generate topspin on your serve. It’s topspin that provides you with the control necessary to hit aggressive while keeping the ball in the court.
- Flex: The continental grip positions the face of the racquet so that your wrist can more easily flex throughout the service motion. As you learn how to serve or spend time refining your current serve, you’ll find that this flex helps enable a fluid motion with your serve while also allowing you to snap your wrist to achieve topspin.
If you’re like most beginners, you may have started with some version of a forehand grip, which positions the face of the racquet and your strings toward the net when you hold it out in front of you as shown in the following picture – this grip is incorrect for your serve.

However, without an understanding of the proper technique and mechanics necessary to hit an effective tennis serve, this grip is pretty logical.
The ball needs to travel forward, so you position the face of your racquet forward, too. This way, when you hit the tennis ball, it moves toward the net and into the service box.
The challenge is that a forehand grip severely limits your ability to progress your serve and get better over time because you cannot achieve the benefits mentioned above.
Recognizing this, let’s jump into the proper technique for holding your continental tennis serve grip.
Tennis Serve Grip Technique
The technique for your tennis serve grip boils down to how you need to hold your tennis racquet to form the continental grip. There are a few different ways you can approach forming the continental grip – let’s take a look at each.
Shake Hands With Your Racquet
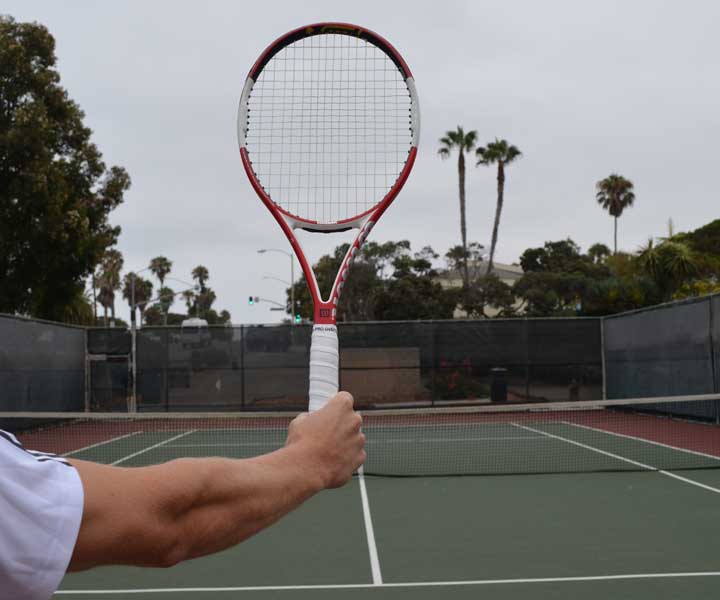
One of the easiest ways to learn how to form the continental grip is to hold the racquet out in front of you and reach out and shake hands with the tennis racquet.
Hold your tennis racquet out in front of you with the edge of the racquet frame pointed down toward the court, i.e., perpendicular to the ground, and the strings facing to the side. When you go to shake hands with the racquet, your grip should be very close to holding a continental grip.
Here’s a video that shows you how to “shake hands with your racquet.”
This easy method is great for beginners and kids as it helps provide them with a simple reference to remember the grip. After showing a group of kids how to hold this grip, you can usually shout out “shake hands with your racquet,” and they’ll all be able to find the grip quickly.
Hold Your Racquet Like a Hammer
Another reference often used is to hold your racquet like a hammer, where you imagine using the side of the racquet to hammer a nail.
Similar to shaking hands with your racquet, this simple method should provide you with an easy-to-remember technique to hold your continental serve grip.
Find The Right Bevel
The most exact way to find your tennis serve grip is to use the bevels of the handle, which you may not have even noticed were there.
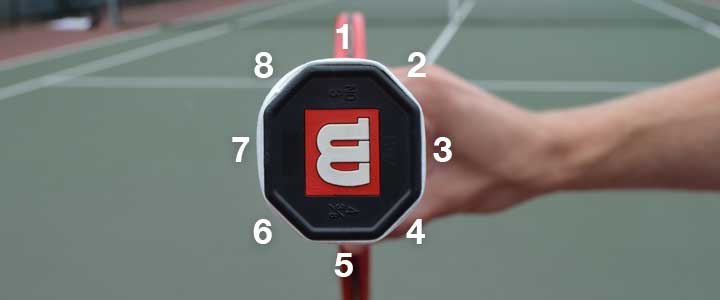
If you take a look at the handle of your tennis racquet, you’ll notice it is an octagon, with eight sides or bevels, just like a stop sign.
To find the correct grip, we can number each bevel of your handle. With the racquet out in front of you and the side of the racquet frame pointing down toward the court, we’ll label the very top bevel as 1, and then each subsequent bevel moving clockwise all the way around to 8.

If you’re right-handed, you’ll want to open your hand and place the inside of your index finger’s knuckle against bevel 2 (or bevel 8 if you’re left-handed) and then grip the racquet.
Here’s another video to show you exactly what I mean.
Once you do this, you should be holding a continental grip.
Tips for Your Tennis Serve Grip
When you first begin to use a continental grip for your serve, it’s likely going to feel a bit awkward and will take some time until it feels normal. To help, here are some of our favorite tips for your serve grip.
Relax Your Hand
Often when serving, players will tightly grip their racquet handle. Perhaps they’re worried the racquet is going to fall out of their hand when they serve, or they believe that a firm grip will allow them to hit harder.
However, when it comes to tennis, tension is a player’s worst enemy because it prevents your body from remaining fluid and flexible, which is where much of your power and control originates.
So, rather than tightly holding your serve grip or squeezing your racquet handle too hard, relax your hand, so the racquet handle is secure yet loose enough to allow your wrist and arm to move freely.
Spread Your Fingers
Another tip that can be useful for players learning the continental serve grip is to spread your fingers slightly.
When most players first grip their racquet for their serve, they tend to crowd their fingers, which can make it harder to control their racquet frame.
If you allow your fingers to spread out a little when gripping your racquet, you should notice that you have more control and can, therefore, more easily maneuver your racquet head. This small tweak is particularly helpful when changing the angle or direction of your racquet for the different types of tennis serves, including flat, slice, topspin and kick.
Raise Your Index Finger

Playing on the tip above to spread your fingers, it can also be helpful to lift your index finger so that it reaches farther up the racquet handle.
Again, similar to spreading your fingers, extending your index finger up the handle of your tennis racquet will provide you with added stability and control of your tennis racquet through your service motion.
There’s no need to exaggerate here, but do what feels comfortable.
Switching Grips
At first, you may find it challenging to move quickly from your continental grip to your groundstroke grips and, in particular, your forehand grip. If you’re having that problem, my biggest tip for you is to stick with it.
Yes, it does take some time to get comfortable with switching your grip. However, it will pay off in the long run, and before you know it, switching grips will be second nature – you won’t even have to think about it.
Furthermore, your continental service grip is the same grip you should be using for your volleys and overheads.
This grip is incredibly important when you learn to serve and volley because you’ll be approaching the net after you serve, which means your opponent’s return is going to reach you quickly, and you won’t have any time to adjust your grip.
Tennis Player Serve Grips
Sometimes it can be helpful to see how other players are holding their racquets to get a better feel for the grip you should be using.
In this section, we’ll take a look at the serve grips for Roger Federer, Novak Djokovic, Rafael Nadal, Nick Kyrgios, and Pete Sampras.
Roger Federer
Novak Djokovic
Rafael Nadal
Nick Kyrgios
Pete Sampras
Wrapping Up
If you have questions about how to form your tennis serve grip or about anything covered in this article, please feel free to post a comment.
We’d love to hear from you!
Home > Instruction > Serve > Tennis Serve Grip Technique
Play Better Tennis
Improve your game alongside our community of tennis players
Why join?
Discussion Boards
Join the conversation with other members of the community.
5 Point Friday
Read our weekly recap of the 5 most interesting things we dig up in tennis.
Trackbacks & Pingbacks
Leave a Reply
Want to join the discussion?Feel free to contribute!


Nicely done, very clear…even I can do this!
Hey, John! Thanks for the positive feedback. Glad to hear the article was clear and easy to follow.
~ All the best, Jon
Jon; I move my grip further left than continental when trying to get extra kick on the ball, as did Edberg. No doubt the flex in the wrist is increased with the proper grip. I never, when talking to players, talk about “power”. That word conveys tight muscles. Rather, one should stress racket head speed, just as a golf coach talks of club head speed.
Relaxed and rhythmic is critical to good serving. My high school coach (ex U of Wisconsin) stress the relaxed body, arm and wrist. while serving, and turned out great servers, most of whom played university tennis. ,
I like this campaign. I’d like to receive more techniques and teaching videos so as to improve my play.
Very clear,Thanks a lot
Thank you for stopping by! Glad it was helpful.
Believe the illustration on bevel numbering is “clockwise”. Thanks for tips.
Hi Rjue,
You’re welcome and great catch! I updated from counterclockwise to clockwise to reflect how the diagram displays the bevel numbering.
All the best,
Jon