Check out my custom vibration dampener


Tennis Serve Toss: Technique, Tips & Drills for Perfection
Learn to Toss Consistently

The tennis serve ball toss is easily the most underrated motion of the tennis serve that can either be an asset or wreak havoc on your game.
In this article, we’re going to do an in-depth look at the tennis serve toss and provide you with everything you need to develop or improve your ball toss.
Article Contents
Click below to jump to a section
Tap below to jump to a section
Importance of the Toss
Proper Toss Technique
How to Toss
Ideal Release Point
Toss Height
Placement & Location
Telegraphing Your Serve
Toss Tips
Toss Drills
Toss Rules
Training Equipment & Tools
Wrapping Up
New to TennisCompanion?
Create a free account and explore my latest videos below
The Importance of a Great Toss
Similar to your serve stance, your toss is vital to developing an effective serve.
Let’s take a look at four key reasons why the serve toss is so important.
- Consistency: Your ability to hit a consistent serve is partially dependent on your ability to perform the same service motion time and time again. If your serve toss is inconsistent, poorly placed, or not at the appropriate height, then it makes it challenging to perform the same service motion over and over, which subsequently may lead to an inconsistent serve.
- Accuracy: Similar to consistency, an accurate serve starts with a well-placed toss that enables you to perform the same service motion over and over so that you can direct the ball exactly where you want it to go. Without a quality toss, you may find it considerably more challenging to place your serve accurately.
- Comfort: A well-placed toss will also help ensure you feel comfortable throughout your service motion, which will, in turn, help you stay relaxed, generate power and avoid injury after years of repetition.
- Power: Last but not least, your toss can assist in ensuring you benefit from the energy stored in your trophy pose and service motion. If you do not place your toss well, you may find yourself overreaching or crowding yourself, which will make it more challenging to accelerate through the serve to generate power.
Hopefully, these reasons help convince you that developing an excellent tennis serve toss is a worthy investment of your time.
Let’s move on to talk about the technique required to learn or perfect your serve toss.
Proper Toss Technique
To simplify the motion for your serve toss, let’s break the technique down and discuss three key components:
- The joints of your arm
- Leading with your elbow
- How to hold the tennis ball
The Joints of Your Arm & The Toss
When you’re not tossing a tennis ball for your serve, the joints of your arm are incredibly useful. Joints enable a range of motion and allow your arm to move freely. However, when it comes to your serve toss, it’s crucial to limit movement within specific joints so that you can achieve consistency.
If we stop to think about it for a moment, there are four primary parts to your arm where joints are present:
- Shoulder
- Elbow
- Wrist
- Fingers

If we allow all of our joints to move freely throughout the tossing motion, there are more moving parts, which increases our margin of error.
However, we can easily solve for this by eliminating the movement in our elbow, wrist, and fingers so that our shoulder can do the work.
To practice, set your feet in the correct serve stance and then hold your tossing arm out in front of you roughly in-line with your front foot and your palm facing up.
Keep your elbow and wrist straight and practice moving your arm up and down with your shoulder. Be careful not to lock your elbow and your wrist by flexing your forearm or bicep because tension in your arm will make it challenging to achieve fluidity within your shoulder and for the rest of your body throughout the service motion.
Instead, you’ll want to hold your tossing arm straight and limit motion within our elbow, wrist, and fingers so that our shoulder is the only joint responsible for the toss and acting as a lever.

Leading with Your Elbow
A common challenge for players with their tossing motion is that they think of it more like a swinging motion than a lifting motion. Here’s an example of an incorrect toss motion:

It’s a subtle distinction, but it can make a big difference in the result of your toss. The good news is that there is an easy fix for this.
When performing your toss, visualize leading the tossing arm with our elbow. It can be helpful to imagine there is a string tied around your elbow that is lifting your arm from that spot.
Leading with your elbow helps naturally transition your tossing arm from a swinging motion to a smooth lifting motion. It also has another significant side effect of helping keep your elbow roughly straight and eliminating that joint from the movement.
How to Hold The Tennis Ball
Last but not least, as we work our way down the arm, let’s talk about how to hold the tennis ball in your hand. As with the rest of your tossing motion, the key is to limit movement, so that you can perform your toss consistently every time.
To accomplish this, you’ll want to hold the tennis ball in your fingertips, which has the benefit of removing your finger joints from the equation, while also ensuring nothing gets in the way of the ball the moment you release it from your hand.
I recommend using three or four fingers when holding the ball. Doing so should provide you with a secure enough grip but limits the number of touchpoints against the ball, helping eliminate unnecessary movement or contact during the release. You’ll likely have to play around with each to see what feels comfortable.
The following image shows examples that should help you hold a tennis ball just right.
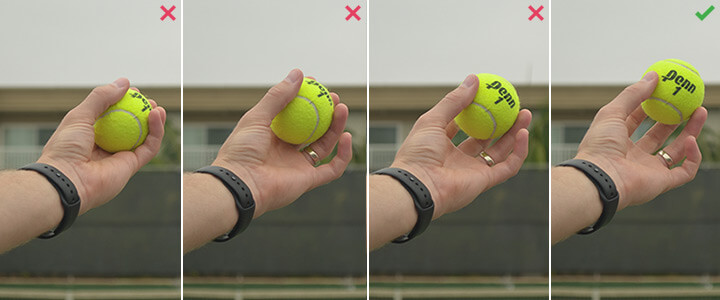
The image furthest to the left shows an example of holding a tennis ball too deep within your palm, which brings all your fingers into the mix and significantly increases the likelihood of an inaccurate toss.
In the next photo to the right, the ball position is away from the palm, which is better, but your fingers are still heavily involved, which again increases the likelihood that your toss will go awry.
In the third photo from the right, the ball’s position isn’t terrible, but what you’ll find is that you still may get some rolling action off of the tips of your fingers. If the ball is rolling off your fingers, it’s going to be significantly more challenging to achieve consistency with your toss.
The final image on the right is ideal. The ball is held at your fingertips while still providing sufficient grip.
Helpful Tip:
Don’t grip the ball at your fingertips too hard. I recommend that you hold the ball more like an egg so that you remove tension from your tossing arm, which allows you to release the ball quickly and toss more smoothly.
To practice, set your feet in the correct serve stance and then hold your tossing arm out in front of you roughly in-line with your front foot and the ball in your fingertips.
Lift your arm with your shoulder, leading with the elbow and then roughly when your hand reaches the top of your head, release the ball and open your hand completely.
That last part “open your hand completely,” can be helpful to consciously think about during your toss because it forces you to quickly release all of your fingers simultaneously, which limits misdirection off your fingertips.
How to Toss a Tennis Ball
Now that you understand the proper technique behind the serve toss let’s string all of the steps together.
If you haven’t already, I’d highly recommend you check out our article on the trophy pose so you can link the toss with the rest of the trophy pose motion.
Doing so helps ensure you’re learning and practicing your toss as you would within a match, rather than only practicing the toss standing still.
- Set your feet in the correct serve stance
- With your weight slightly forward on your front foot bounce the ball a few times in front of you and release any tension from your hands, arm, and body
- Hold a tennis ball lightly in your fingertips and move your hands into the ready position with the ball lightly touching your tennis racquet in front of you
- Begin transferring your weight slowly towards your back foot
- As your weight reaches your back foot start to move into your trophy pose
- Drop your hands down together and then lift your tossing arm towards the sky using your shoulder. Lead with your elbow and keep your arm straight. Once your arm reaches the top of your head, open your hand wide to release the ball.
- As your tossing arm moves upward, allow your dominant arm that is holding your racquet to swing back like a pendulum behind you and then continue up behind your head.
- Bend your knees so that you’ve achieved a full bend by the time your arms complete their motion.
Here’s a quick video showing all of these steps linked together:
Now that you know how to toss a tennis ball, let’s get a little bit more specific about the appropriate release point, height and placement for your serve toss.
The Ideal Release Point
As you release the ball for your toss, you’ll likely find the proper release point naturally, but if you’re wondering, the ideal release point for your toss typically falls between eye level to the top of your head.
That release height ensures you’re not releasing the ball too early, which can make it difficult to place your toss accurately, or too late, which can also lead to an inaccurate toss.

The Height of Your Toss
At first glance, the height of your toss may not seem like a big deal. However, your toss height does play a rather significant role in your ability to execute a quality serve.
There are three main reasons why the height of your toss is essential:
- Timing: When you toss a tennis ball, you’re providing yourself with just enough time to complete your service motion, which includes the trophy pose as well as your swing. If you toss the ball too high, it’s going to force you to pause in your trophy pose or hesitate and wait for the ball to fall to a height where you can strike it with your racquet. If you toss the ball too low, you won’t have enough time to complete your service motion.
- Comfort: The height of your tennis serve toss is one element that will help ensure your service motion feels smooth and comfortable, which is essential when it comes to generating power. If your toss is too high, you may find yourself overreaching to hit the ball or having to hold your trophy pose unnecessarily for an extended period. On the other hand, if your toss is too low, you may find that you crowd yourself, which doesn’t allow you to fully extend through the serve diminishing your ability to generate power.
- Power: As mentioned in the previous bullet, the correct serve toss height will enable you to swing comfortably and therefore allow you to generate maximum power and racquet head speed through your service motion.
Of course, that begs the question.
How high should you toss a tennis ball for your serve?
The answer is roughly 2-3 feet above the maximum reach of your racquet. However, it’s important to note that there is no perfect toss height.
We all come in different shapes and sizes, which causes each of us to execute our service motion with a slightly different rhythm and tempo.
As a result, you need to find the height that allows you to time your serve while maintaining comfort throughout your motion effectively.
Helpful Tip
The higher your toss, the more likely it will be subject to the wind. A stiff breeze can throw off a perfectly executed toss, which is worth keeping in mind as you find the toss height that feels right for you.
Toss Placement & Location
Next, let’s review where you should place your serve toss.
To tackle this topic, we’re going to talk about toss placement in context with the three primary types of tennis serves:
- Flat serve
- Slice serve
- Kick serve
Flat Serve Toss Placement
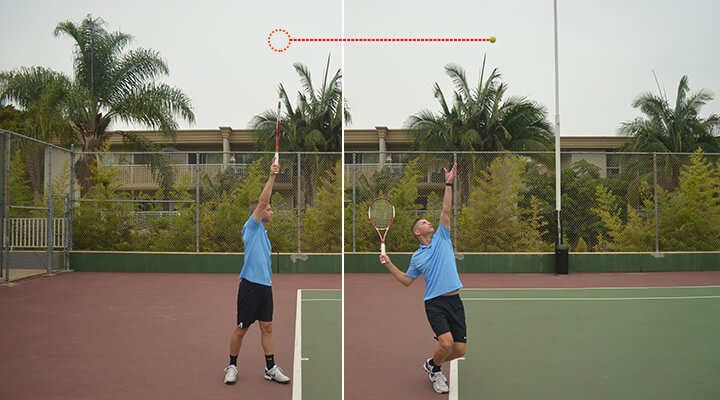
Your ball toss for a flat serve should fall inside the court roughly 12-18 inches in front of you and approximately 6 inches to the right of your tossing arms shoulder at the peak of the toss.
You want the ball out in front of you so that you can push up and into the court during your motion, which will help you accelerate through your serve and generate power.
Here’s a quick video from behind so you can get a sense of where you should place the ball for your flat serve.

I’ve paused the video at the peak of the toss so you can see how the ball is roughly in line with my tossing arm’s shoulder.
Keep in mind that the location of your toss should allow you to swing comfortably through your flat serve. If the motion doesn’t feel comfortable, you’ll likely be limiting your potential to generate power with your flat serve.
Slice Serve Toss Placement
Your toss for a slice serve should be placed roughly in the same location as your flat serve. Many players will toss the ball further to the right (if you’re a righty) because it feels more natural to hit the ball from the side to generate spin.
However, the vast majority of the spin will result from the angle of your racquet when you contact the ball. As a result, you shouldn’t need to toss further out to the right to generate the sidespin that moves the ball out wide.
The placement of your toss for your slice serve will help you exaggerate the angle and therefore generate more spin.
Here’s a quick video of the proper toss placement from behind for a slice serve.

Again, I’ve paused the video at the peak of the toss so you can see how the ball is approximately 6 inches to the right of your tossing arms shoulder, just like the flat serve.
Helpful Tip:
One of the benefits of having a toss that looks virtually identical for your flat and slice serve is that it makes it harder for your opponent to read where you intended to place your serve.
The concept of “showing” your opponent where you’re going to serve is known as telegraphing your serve.
For example, if you exaggerate your slice serve toss location by placing it further to the right to generate even more slice, then you may be giving up the intended placement of your serve to your opponent.
Kick Serve Toss Placement
When it comes to your kick serve, you’ll want to place your toss inside the court roughly 6-12 inches out in front of you, but you’ll also want to set the toss slightly behind you.
If you were to toss the ball for your kick serve and let the ball fall back to the court, you’d want the ball to land roughly on top of your head or slightly behind your head.
Helpful tip: Keep in mind that “behind you” doesn’t refer to the direction of the fence. Assuming you’re in the correct serve stance behind you will be tossing the ball roughly parallel with the baseline.
Here’s a quick video from behind for a kick serve.
I’ve paused the above video at the maximum height of the serve again so you can see the difference.
Using this toss and hitting a kick serve allows you to accelerate up and into the tennis ball so that you can generate maximum topspin.
Topspin allows you to hit the ball aggressively while also giving you a large margin of error. The ball will travel higher across the court and above the net, but the topspin that you generate will ensure the ball drops back down into the service box.
With enough topspin, you’ll also achieve a “kick” where the ball jumps upward after making contact with the court, which is where the kick serve gets its name. An effective kick serve will have enough topspin on it so that the ball jumps up and out of your opponent’s strike zone, making it challenging to return.
The Perfect Toss Placement
Hopefully, you’ve noticed that there isn’t a perfect place or location to toss a ball that we can teach for each player.
Players come in different shapes, sizes, and builds. Also, the ideal toss location is modified slightly depending on the type of serve you’re hitting, so the exact or perfect toss location can differ.
The important thing is that when you’re practicing your serve that you experiment using my recommendations in the section above as a guide, but find the specific locations that feel good to you.
Once you’ve found an ideal toss location for each type of serve, you’ll want to practice hitting that same spot over and over again using the technique described in this article to achieve accuracy and consistency of placement.
Telegraphing Your Serve
You may have heard of telegraphing your serve or “showing” your opponent what type of serve you’re going to hit through the location of your toss. Telegraphing may happen when the placement of your toss differs for your flat, slice and kick serve.
The good news is that a well-executed toss for your flat and slice serve make it challenging for your opponent to detect because from across the court, there should be little if any noticeable change in the toss. Remember, your slice serve toss should be virtually identical to your flat serve.
Players sometimes get themselves into trouble when they exaggerate their slice serve toss further right to get more spin. The change in toss gives your opponent a hint at the type of serve that you intend to hit, such as a slice serve out wide, so they can begin moving in that direction before you even strike the ball.
With your kick serve, your opponent will likely be able to tell the type of serve you’re hitting, and generally, that’s okay.
For many players, the kick serve is their default second serve. Therefore, your opponent is already expecting you to hit with less pace and a higher margin for error, but they won’t know which direction you intend to hit the ball, i.e., out wide, at their body or down the middle.
Being able to disguise your serve is something that players tend to benefit more from at higher levels of competition, where every small advantage can make a huge difference. Don’t get too concerned if you’re just starting a bit more obvious with your tosses.
Tips for Perfecting Your Toss
Here are a few tips that will help you execute an effective toss time and time again.
Tip #1: Relax Your Tossing Arm
Before you begin your service motion, make sure to relax your body as well as your tossing arm. Tension, squeezing, or flexing your tossing arm will increase the likelihood of a wild toss, and that pressure will also make it more challenging to execute a fluid service motion.
Tip #2: Open Your Hand to Release the Ball
When you release the ball, it can be helpful to consciously think about opening your hand because it forces you to release all of your fingers simultaneously. This simultaneous release helps decrease the likelihood that you end up with the ball rolling off your fingertips, which is a frequent cause of inaccurate tosses.
Tip #3: Keep Your Tossing Arm Up
When you release the tennis ball from your hand, make sure you keep moving your tossing arm upward. Also, keep your arm up high as long as possible because this will prevent your shoulder from dropping prematurely, which is frequently a problem for players.
If you do allow your shoulder to drop early, you’ll find your shoulders open up to the court slightly, which throws off your service motion hurting the accuracy of your serve and makes it considerably harder to accelerate or generate power.
The shoulder drop tends to be more of a problem for players late in a match when fatigue begins to set in, so make sure you keep your arm up until the moment you start to swing at the tennis ball.
Tip #4: Keep Your Head Up
Similar to keeping your tossing arm up, make sure to keep your head up during your service motion. When you drop your head to look at the court or the direction of the ball, you’re more likely to mishit.
Just as important, when you drop your head, your body tends to follow, so make sure to keep your head up towards the sky along with your tossing arm.
Tip #5: Pick Your Serve
Another helpful tip for your toss is to make sure you’re picking the type of serve you’re hitting before you toss the ball. As we’ve talked about, there are slight variations in your toss placement depending on which kind of serve you’re hitting, so you want to make sure the toss is accurate.
Some players will change the type of serve they’re going to hit halfway through their service motion, so their toss isn’t well placed, and they don’t end up with a great result. Changing your mind last minute can sometimes happen when players see their opponent moving around or moving forward out of the corner of their eye as they begin their service motion.
Remember, accurate toss placement is part of where the accuracy of your serve comes from, so be sure to pick the type of serve you plan to hit before you start into your motion.
Tip #6: Be Picky
Being picky about which tosses you hit is one of the most simple but useful tips with regards to the serve that I can offer when you’re starting. If you don’t like your toss, don’t hit it. It sounds simple, but it’s surprising how many players will commit to hitting a bad toss.
Some players don’t know that they can redo their toss. Other players don’t realize they’re rushing themselves because they’re frustrated at their performance, trying to play too quick because of their nerves, or some similar scenario.
Remember, your serve is your greatest offensive weapon, so it’s essential that you can execute it to the best of your ability, so don’t throw away points with a toss that isn’t up to your standards. This tip is particularly useful when playing outside where you toss is subject to the wind and position of the sun.
Helpful Tip:
Technically, you only have 20 seconds from the time one point ends to the time the next point should begin. It’s important you don’t hit a lousy toss, but you also need to keep in mind the time limit you have between points, i.e., you can’t just sit there and toss until it’s perfect. Depending on the pace of the match and how quickly you’re getting to the baseline, you’ll typically have the chance to throw up 1-3 tosses.
Just be respectful of your opponent and don’t abuse this privilege with every serve. You’ll also find that some opponents will become annoyed if you are continually repeating your toss because they’re stuck guessing when you’re going to hit your serve. Most players will be more forgiving on a windy day because they know they’ll be in the same position as you when it’s their turn to serve.
Drills for Practicing Your Toss
As with any part of your game, practice makes perfect. In this section, we’ll cover some of the most popular drills you can use to improve your toss.
Drill #1: Accuracy & Consistency Drill
When players are first learning how to toss the ball for their serve, it can take quite a bit of time to develop consistency and accuracy. This drill is excellent for beginners and will help you develop a more consistent and accurate toss. Here’s an overview of how to perform this drill.
Gear you’ll need:
- Your racquet
- Some spare tennis balls
- A ball basket or hopper
Step 1: Fill your basket
The first step is to grab your basket or ball hopper and fill it about halfway up (or less) with tennis balls. If the basket is full or empty, the ball is likely to bounce right out, so filling it halfway up will ensure the ball stays in place.
Step 2: Place your basket
Next, grab your basket and position yourself along the baseline near the center mark, set your serve stance, and put your basket roughly 12-18 inches in front of your left foot and then 3-6 inches to the right. Reverse this if you’re a lefty.
Helpful Tip:
If you don’t have a basket, you can simply position your racquet or a spare racquet so that the head of the racquet is where the basket would be on the court. You can also use a small container or bucket – you just want to have a reasonably sized target for where your toss should land.
Step 3: Position yourself and set your stance
Once you’ve placed your basket, you’ll want to grab a tennis ball position yourself in front of the basket. Again, set your serve stance so that the basket is still roughly 3-6 inches to your right.
Step 4: Toss the ball
Lastly, with a ball in your hand, you’ll want to toss the ball up in the air and try to get the ball to land in the basket. Be sure to use your full toss motion and technique we covered earlier in this article.
You can change this drill up in a few different ways. First, you can do it standing still in front of the basket, or you can add in the full trophy pose. If you’re a beginner, it can be helpful to practice for a while without your racquet to get a feel for the toss and practice your technique.
Once you get comfortable, I’d recommend you start to incorporate the full trophy pose because your toss will be very different standing still vs. moving your entire body.
You can also change up the goal of the drill – here are a few ideas:
- Number of tosses completed, i.e., complete 50 tosses
- Number of tosses in the basket, i.e., keep tossing until you get 10 in
- Number of tosses in the basket in a row, i.e., keep tossing until you get 3 in a row
Drill #2: Toss Height Drill
A question that frequently comes up with players when they’re learning to toss is how high they should toss the ball. As you learned earlier in this article, the ideal toss height is roughly 2-3 feet above the maximum reach of your tennis racquet.
This drill will provide you with an easy way to practice developing a more consistent toss height on any tennis court surrounded by a fence. Here’s an overview of how to perform this drill.
Gear you’ll need:
- Your racquet
- Some spare tennis balls
- A ladder
- A friend to help
Step #1: Place your height markers
In this first step, you’ll want to mark the appropriate height on the fence by placing two tennis balls. To do this, stand next to the fence with your racquet in hand. Reach your racquet up and touch it against the fence at your maximum reach.
Next, have your friend grab the step ladder and place it next to you so they can climb and stick two balls in the fence – one at roughly 2 feet above your maximum reach and another about 3 feet.
Step #2: Position yourself and set your stance
Now that you’ve marked the fence, you’ll want to position yourself against the fence directly beneath the two balls that you placed in the fence.
With your racquet in hand and a spare tennis ball, position yourself in your serve stance with the front of your left foot about 1-2 feet from the fence. Reverse if you’re a lefty.
Step #3: Toss the ball to hit your target
Next, you’ll want to practice your toss so that the height of your toss falls roughly in between the two balls you’ve placed in the fence.
When performing your toss, make sure you’re using the correct toss technique and assume your trophy pose with each practice toss.
Let each toss fall back to the ground, reset your feet in the correct serve stance, and toss once again.
Similar to drill No. 1 you can change up the goal of this drill.
- Number of tosses completed, i.e., complete 50 tosses
- Number of tosses hitting the target, i.e., keep tossing until you hit it ten times
- Number of tosses hitting the target in a row, i.e., keep tossing until you hit your target three times in a row
Drill #3: Toss Pose Drill
One of the challenges that players face when tossing the ball is not fully extending their tossing arm up into the air and dropping their arm and head prematurely.
The goal of this drill is to help players practice their tossing motion to make sure they keep their arm high and head up.
Gear you’ll need:
- Your racquet
- A tennis ball
Step #1: Position yourself and set your stance
With your racquet in hand and a spare tennis ball, position yourself along the baseline near the center mark and assume your serve stance.
Step #2: Toss the ball
Next, you’re going to want to toss the ball using your full trophy pose.
Focus your attention on extending your tossing arm up and release the ball, but imagine there’s a string tied to your wrist that keeps pulling your arm up towards the sky.
When you reach full extension, pause for a moment with your arm held high, your head up, and your body in your trophy pose.
Repeat this motion 10-20 times, focusing intently on keeping your tossing arm extended with your head held high.
Rules for the Serve Toss
When it comes to the serve toss, there are a few rules to keep in mind.
First, when you toss the ball, you must release it by hand unless you are only able to use one arm, i.e., because you just have one arm or because your tossing arm is injured.
If you are limited to one arm, then you can use your racquet to toss the ball. Most people would never break this rule, but it is indeed a rule.
Outside of that, perhaps the most common question that comes up with regards to toss rules is how many times you can toss the ball before hitting your serve.
The reality is there is no limit as long as the ball doesn’t hit your racquet or you don’t swing and miss. If either of those happens, then it counts as a serve, and you don’t get to keep tossing.
I think the most important note here is sportsmanship and respect for your opponent. Do your best to limit your tosses, but at the same time use the fact that you can retoss to your advantage.
If your opponent appears to be repeating their tosses on purpose or to gain an advantage, i.e., throw you off, then you can file a grievance. However, I’d recommend you stay away from doing that and focus on what you can control – your own game.
It’s unlikely that this would become a regular problem or something you’d frequently encounter in a competition, so just do your best not to let it get under your skin.
Training Equipment & Tools
There are a few simple pieces of tennis equipment that you can use to improve your toss. Here are the two that I’d recommend.
Just so you know, TennisCompanion may collect a small share of sales from the links below to help keep this site running.
A Ball Hopper or Basket
When it comes to your toss, repetition and practice are key. Having a ball hopper or basket will allow you to practice your toss over and over without having to chase a handful of tennis balls all over the court every time you make a mistake.
I’d recommend a simple ball basket like the Wilson 75 Tennis Ball Pick Up Hopper. Here’s why I like this particular ball basket for practicing your toss:
- It’s durable and made of steel
- It holds 75 balls, which is more than enough
- It has a latch that swings over the top of the basket to keep the balls in when you store it or travel with it
- It can pick up balls by pressing the basket down on top of a tennis ball that’s laying on the court, so you’re not always bending down
- The handles fold down and can be locked securely into the side of the basket so you can stand the basket up at about waist height, which is perfect for quickly and easily grabbing balls while you’re practicing
If you’re wondering whether two baskets would be useful, I’d say yes.
They’re relatively inexpensive, and this way, you can use the spare basket for your ball toss basket drill or split up your balls so your friend can have some on one end of the court, and you can have some on the other end of the court.
A Case of Tennis Balls
Another piece of equipment that I’d recommend for practicing your serve toss is a case of tennis balls. Yep, you don’t need to buy a single can of tennis balls every time you need a fresh set of balls.
Here are a few reasons I’d recommend buying a case of tennis balls for practicing your toss:
- It’s way cheaper than purchasing a single can each time
- The less time you spend chasing balls around on the court, the more practice you’re going to get in for your toss
- Being able to toss over and over without stopping in between will help you develop a rhythm for your toss
- You don’t need to open all at once. Instead, you can just open a few cans at a time so that you can practice your toss with a fresh set of tennis balls every time
All in all, you’ll get more out of your practice time.
Wrapping Up
Hopefully, you’ve found this article useful for learning about the tennis serve toss.
Of course, if you have questions, don’t hesitate to ask in the comments – that’s why we’re here!
Home > Instruction > Serve > Tennis Serve Toss
Play Better Tennis
Improve your game alongside our community of tennis players
Why join?
Discussion Boards
Join the conversation with other members of the community.
5 Point Friday
Read our weekly recap of the 5 most interesting things we dig up in tennis.
Leave a Reply
Want to join the discussion?Feel free to contribute!