Check out my custom vibration dampener


Tennis Serve Trophy Pose
A Step-by-step Guide

The trophy pose or position is a simple yet effective technique you can use to develop and improve your serve. If you’re just getting started with learning how to serve, you may want to check out our article on the tennis serve stance before you read this article.
Starting with the correct serve stance will help set you up for a more effective trophy pose and therefore serve.
Article Contents
Click below to jump to a section
Tap below to jump to a section
Why It’s Called Trophy Pose
Importance of the Pose
Phases of the Pose
Your Head & The Pose
Achieving Consistent Timing
Establishing Rhythm
Examples
Wrapping Up
New to TennisCompanion?
Create a free account and explore my latest videos below
Why is it Called The Trophy Pose?
Tennis trophies commonly make use of a player hitting a serve, which is where the trophy pose gets its name. Here are a few pictures of tennis trophies:
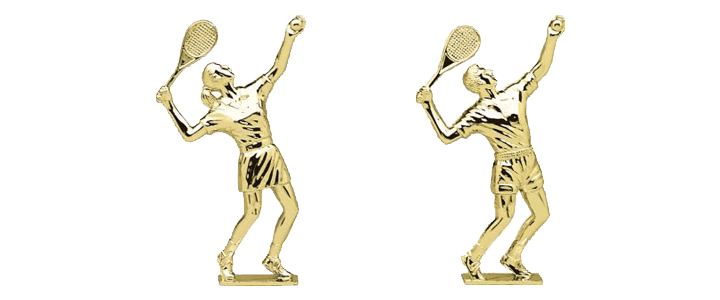
Now that you’ve seen what a tennis trophy looks like, hopefully, it will serve as a simple, convenient reminder for how you’ll want to position your body when hitting a serve.
The Importance of the Trophy Pose
As you can imagine, there’s a reason the trophy pose is so important to the tennis serve, and it’s all about preparation.
The trophy pose is what helps you prepare and position your body to accelerate the racquet through your swing motion, which enables you to generate the power and topspin necessary for an effective serve.
One analogy that might be useful is that the trophy pose is kind of like pulling a slingshot or rubber band back before you release it. There’s a bunch of stored energy in the pose that is ready to be released through the swing.
Ultimately, the trophy pose serves as the foundation for any type of serve you’re hitting: flat, slice, or kick.
The Different Phases of the Trophy Pose
To simplify the trophy pose, we can break it into four essential movements.
However, before we get started, I’d like to point out that each of these four parts of the trophy pose happens simultaneously. I’ve broken them out into four sections to more easily describe each movement, which we’ll then link together to complete the pose.
With that in mind, I’d recommend you practice each movement and then work toward combining the motions as you read the rest of the article.
Backswing
The first step to achieve the trophy pose is the backswing.
First, position your body in the appropriate serve stance, with your hands in the ready position. Next, drop both hands at the same time and let your dominant hand (the one that’s holding your racquet) swing down and back like a pendulum behind you.
You’ll then continue the backward motion with your racquet upward and behind your head until your bicep is roughly parallel with the court – your forearm is approximately at a 90-degree angle with your bicep.
Toss
As you perform your backswing with your dominant hand, allow your opposite hand – the one that’s holding the ball – to swing forward and up toward the sky so that you can toss the ball upward.
Your toss is crucial for an effective serve, so we’ve expanded on the topic in our article on perfecting your toss – check it out for more details on getting this exactly right.
Helpful Tip: To ensure your backswing and toss are in sync, many players find the mantra “down together, up together” particularly useful. With your feet in the correct stance and hands in the starting position, you’ll want to bring both hands down together and then up together as you complete your backswing and toss. Give it a try.

Knee Bend
Next, you’ll want to add in the knee bend, which should happen simultaneously with your dominant hand’s backswing and your opposite hand tossing the ball.
By the time you complete your backswing and extend your arm for the toss, your knees should be fully bent. In other words, your lower body and upper body should finish their motion at the same time.
The amount that you bend your knees will vary quite a bit from player to player. Just remember that a significant share of the power on your serve comes from your legs, so make sure they’re fully engaged and bent enough so that you can take full advantage of the energy from your legs.

Weight Transfer
The weight transfer is another movement that helps set up your body for maximum acceleration and power, but before you add in the weight transfer, make sure you feel comfortable with the three parts we’ve discussed so far: the backswing, toss, and knee bend.
The easiest way to begin the weight transfer is to start with your weight slightly forward on your front foot. Then, with your hands in the ready position, you can slowly rock your weight toward your back foot.
As this happens, you’ll want to let your hands down together and begin to bend your knees so that you start to bring your weight forward toward the court. Then bring your hands up together and complete the backswing, toss, and knee bend all at the same time.
Your weight should be moving forward and into the court, as you complete your backswing, toss, knee bend, and weight transfer, and you should find yourself in the trophy position.
Your Head & The Trophy Pose
While it’s natural to look up toward the sky when you toss the ball with the trophy pose, I wanted to touch on two key reasons why keeping your head up is essential:
- The first and more obvious reason to keep your head up is so that you can make eye contact with the ball. If you’re not looking up or you drop your head to look where you’re hitting instead of looking at the ball, then you significantly increase the likelihood of a mishit.
- The second and less apparent reason to keep your head up is that when you drop your head, your shoulders tend to collapse, which causes you to lose proper form and often hit the ball into the net.
The second one tends to creep up on players, and it can be hard to detect by yourself – even a subtle drop of the head can produce a fault. To avoid this issue, make sure you’re deliberate about keeping your head up through contact with the tennis ball.

Achieving Consistent Timing
Timing is crucial with the trophy pose, and there are a few tips you can use to help make sure your motion is on point.
- Down together, up together: The trophy pose begins with you releasing and dropping your hands from the ready position. From there, you’ll bring your dominant hand behind you to complete your backswing, and your opposite arm should raise in front of you and upward to toss. As you go through these motions, it can be helpful to think of your hands coming down together and up together through these motions to keep things well-timed.
- Keeping your upper and lower body in sync: Once you’ve mastered the backswing and toss, it’s merely a matter of adding the knee bend. You should complete your upper body movement at the same time you finish your knee bend.
Establishing Rhythm
While it takes time to develop rhythm through your trophy pose, there’s one tip in particular that will help ensure you produce a smooth replicable pattern of movement: relax your body through the motion.
When trying to connect the different movements for the trophy pose, it’s somewhat natural to want to tense up your body to control your flow better, but tense muscles will work against you when serving.
Remember the rubber band reference from earlier?
The trophy pose is the equivalent of stretching a rubber band. When you release the rubber band, it goes flying, and you want your body to achieve a similar elastic effect, but that can only happen if your body is relaxed and your muscles are allowed to move freely.
Doing so will allow you to achieve maximum acceleration and racquet head speed when you’re hitting your serve for improved power and spin.
Helpful Tip
A simple yet effective way to relax your body before serving is to add in a ball bounce before you serve. Bouncing the ball will provide you with a moment to think about relaxing your muscles and release or shake out any tension before you begin to move your body into your trophy pose.
Trophy Pose Examples
To show you how fundamental the trophy pose is to your serve, let’s take a look at a few examples from some of the top professional players on tour. On the left is Elina Svitolina, and on the right is Kevin Anderson. Both are showing off their trophy pose. At the time of writing this article, both are ranked No. 5 in the world.
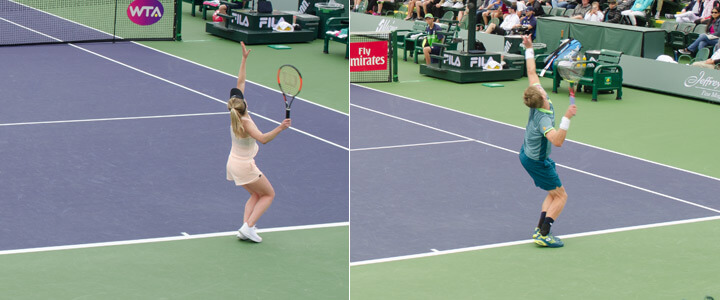
Many players find it challenging at first as they learn to control their body through the trophy pose. Don’t get discouraged. It’s natural for it to take time before you start feeling comfortable. With practice and patience, you’ll have the trophy pose mastered in no time at all.
Wrapping Up
Have questions or want to share your thoughts about the trophy pose? We’d love to hear your comments in the section below!
Home > Instruction > Serve > Tennis Serve Trophy Pose
Play Better Tennis
Improve your game alongside our community of tennis players
Why join?
Discussion Boards
Join the conversation with other members of the community.
5 Point Friday
Read our weekly recap of the 5 most interesting things we dig up in tennis.
Leave a Reply
Want to join the discussion?Feel free to contribute!